HOWTO
How to: Use the NuGet packages
All the Domain Services backend components (.NET) are bundled and deployed as NuGet packages on nuget.org. This means they can be directly consumed from within Visual Studio using the NuGet Package Manager.
To consume a NuGet package, do the following:
- In Visual Studio, right-click on your project and select Manage NuGet Packages.
- Select Browse in the upper left corner.
- Optionally, enter a search criteria and/or select a dedicated package source.
- Select the package and press the Install button.
How to: Create and register a validator for document upload
The Domain Services Web API component DHI.Services.Documents.WebApi exposes actions for up- and downloading documents. This API can be configured to validate documents before uploading them to storage.
Writing a custom validator
Validators are application-specific code that you write yourself as part of your project.
You create a custom validator simply by inheriting from the abstract BaseValidator class defined in DHI.Services.Documents and implement the Validate() method.
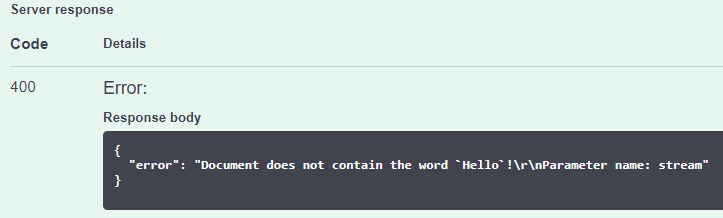
In the below example, the TxtValidator validates that the uploaded text files (*.txt) actually contains the phrase "Hello":
public class TxtValidator : BaseValidator
{
    public TxtValidator(string pattern = @".*\.txt$")
        : base(pattern)
    {
    }

    public override (bool validated, string message) Validate(Stream stream)
    {
        TextReader reader = new StreamReader(stream);
        var text = reader.ReadToEnd();
        return text.Contains("Hello") ?
            (true, null) :
            (false, "Document does not contain the word `Hello`!");
    }
}
In the constructor, you must declare the pattern deciding which type of files that will be validated by this particular validator.
The pattern argument must be a regular expression.
Registering a validator
The validators are registered in the startup.cs file.
This is done simply by adding validator instances to the Validators property of the document service(s). You can register multiple validators that will be processed in the order that they are registered.
var documentService = Services.Get<DocumentService<string>>("AzureFileStorage");
documentService.Validators.Add(new TxtValidator());
documentService.Validators.Add(new XlsxValidator());
If validation fails, the file will not be uploaded and a response with error code 400 Bad Request will be returned together with the message returned from the validator:
How to: Register services in a web project
Registration of services in an ASP.NET Core project is done in the Program.cs (or Startup.cs) file.
Some "system" services are registered directly in the standard DI-container of ASP.NET Core. This takes place in the service collection of the of the WebApplicationBuilder object (the builder variable). . An example of this is shown below:
builder.services.AddScoped<IAccountRepository>(provider => new AccountRepository("[env:SqlServerConnectionString]"));
builder.services.AddScoped<IUserGroupRepository>(provider => new UserGroupRepository("[env:SqlServerConnectionString]"));
builder.services.AddScoped<IRefreshTokenRepository>(provider => new RefreshTokenRepository("[env:SqlServerConnectionString]"));
builder.services.AddScoped<IAuthenticationProvider>(provider => new AccountRepository("[env:SqlServerConnectionString]"));
builder.services.AddScoped<ILogger>(provider => new JsonLogger("[AppData]log.json"));
Other types of services must be registered in the ServiceLocator which is a dictionary of services. The registration key is called the connection ID.
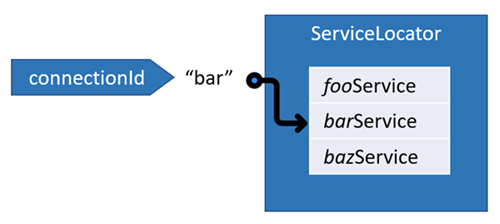
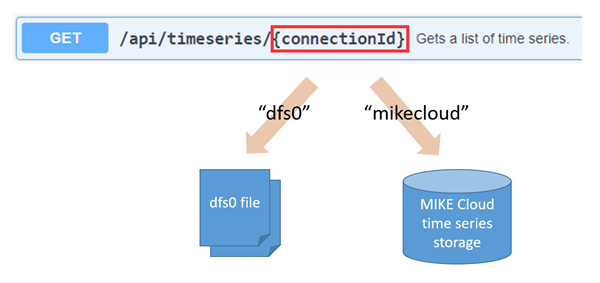
These connection IDs are used directly in the URLs of the Web API components. This way you can register multiple instances of for example a TimeSeriesService - each using using different storage repositories. Then, at run-time, when making requests to the Web API, you can decide which connection to use. In the example shown below, you can switch between a dfs0-connection to a collection of dfs0-files and a mikecloud-connection to time series storage in MIKE Cloud.
There are 2 ways to accomplish this:
The recommended approach is configuration in code, as it tends to be the most simple and robust. It gives you support from Visual Studio IntelliSense and ensures compile-time check of your configuration. Configuration using the connections.json file is is mostly there for legacy reasons.
Configuration in code
With this approach, you manually wire up the services and register them in the ServiceLocator directly in code in the Program.cs file. An example is shown below:
var repository = new Daylight.TimeSeriesRepository();
var service = new CoreTimeSeriesService(repository);
ServiceLocator.Register(service, "daylight-ts");
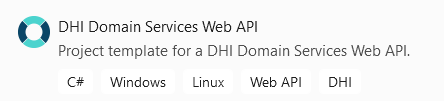
The Visual Studio template "DHI Domain Services Web API" is prepared for configuration in code:
Configuration in connections.json
With this approach, you maintain a repository of connections in the connections.json file. A connection is a "recipe" on how to create a service object. This is an implementation of the abstract factory pattern.
This approach has two advantages compared to configuration in code:
- You can configure service objects to only be created when they are actually requested (
lazyCreation = true). - You can add new connections to the repository (
connections.json) on-the-fly and have them automatically detected at runtime without having to restart the web service.
However, these advantages are often irrelevant and they do come at a price. Configuring using connections is much more complex than configuration in code. In practice it requires a UI taking advantage of the Connections Web API for managing connections. Alternatively, you can edit the connections.json file manually, but obviously this is not a recommended approach. Furthermore, wrongly configured connections might lead to unpredictable runtime exceptions.
The below example shows a connection in the connections.json file which is equivalent to the one registered directly in code in the above example:
"daylight-ts": {
  "$type": "DHI.Services.TimeSeries.WebApi.CoreTimeSeriesServiceConnection, DHI.Services.TimeSeries.WebApi",
  "RepositoryType": "DHI.Services.TimeSeries.Daylight.TimeSeriesRepository, DHI.Services.TimeSeries",
  "Name": "Daylight time series connection",
  "Id": "daylight-ts"
}
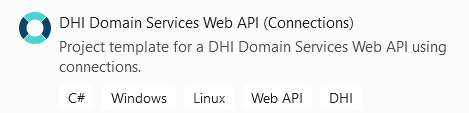
The Visual Studio template "DHI Domain Services Web API (Connections)" is prepared for configuration using connections:
How to: Enable real-time (SignalR) functionality
Real-time functionality is the ability to have server-side code push content to the connected clients as it happens, in real-time. This is an alternative to for example refreshing a web page or using Ajax polling.
Currently, real-time functionality is supported within the following domains:
- JSON documents
- Time series
- Jobs
Configuring the server
To enable real-time functionality in your ASP.NET Core Web API project for existing projects you have to make a couple of additions to the startup.cs file to configure the ASP.NET Core pipeline. In the ConfigureServices method, add the following:
services.AddSignalR();
To accept the JWT from the query string, add the following:
services.AddAuthentication(JwtBearerDefaults.AuthenticationScheme)
    .AddJwtBearer(options =>
    {
        ...
        options.Events = new JwtBearerEvents
        {
            OnMessageReceived = context =>
            {
                var accessToken = context.Request.Query["access_token"];
                var path = context.HttpContext.Request.Path;
                if (!string.IsNullOrEmpty(accessToken) && path.StartsWithSegments("/notificationhub"))
                {
                    context.Token = accessToken;
                }
                return Task.CompletedTask;
            }
        };
    });
Furthermore, the NotificationHub has a couple of dependencies that have to be registered in the DI container:
services.AddScoped<ILogger>(_ => new JsonLogger("[AppData]log.json".Resolve()));
services.AddSingleton<IFilterRepository>(_ => new FilterRepository("[AppData]signalr-filters.json".Resolve()));
In the Configure method, add the following:
app.UseEndpoints(endpoints =>
{
    ...
    endpoints.MapHub<NotificationHub>("/notificationhub");
});
For new projects, this is done automatically if you create the project using the Domain Services Visual Studio project templates version 5.1.0+
For detailed information about configuring the SignalRHub, see Configure server options.
NOTE: If the server is hosted using Internet Information Server (IIS), you must enable Web Sockets on IIS.
Message format
The messages from the SignalR hub are composed of an "action" (a method name) and some corresponding parameters.
Currently, the following actions are supported:
JsonDocumentAddedJsonDocumentUpdatedJsonDocumentDeletedTimeSeriesAddedTimeSeriesUpdatedTimeSeriesDeletedTimeSeriesValuesSetJobAddedJobUpdated
The method parameters are passed using the Parameters type (defined in DHI.Services). The parameters will always contain an id parameter - typically representing the ID of an entity, for example a time series.
Furthermore, the following parameters might be available:
- a
dataparameter - typically a JSON representation of some data, for example an entity or some time series data. - a
userNameparameter - an identifier of a user who performed the action (if known).
Setting up the client
To connect to a SignalR hub from a client, you need a SignalR client library.
There are Microsoft SignalR client libraries available for .NET as well as JavaScript.
To receive SignalR messages, you have to register filters using one of the hub filter methods. The hub filter methods follow the following naming convention "Add{dataType}Filter" - for example AddJobFilter. All of the currently supported hub filter methods take two arguments, a string representing the data connection ID - for example "wf-jobs" - and a filter expressed as an array of query conditions. These are the currently supported hub filter methods:
AddJobFilterAddJsonDocumentFilterAddTimeSeriesFilter
The below code exemplifies a simple .NET desktop client reacting whenever jobs with a priority greater than 1 are updated:
namespace SignalRClient
{
    using System;
    using System.Threading.Tasks;
    using DHI.Services;
    using Microsoft.AspNetCore.SignalR.Client;

    internal class Program
    {
        private static void Main()
        {
            Console.WriteLine("Enter hub port number...");
            var portNumber = Console.ReadLine();
            var url = $"https://localhost:{portNumber}/notificationhub";
            var connection = new HubConnectionBuilder()
                .WithUrl(url, options => { options.AccessTokenProvider = GetAccessToken; })
                .WithAutomaticReconnect()
                .Build();

            connection.On<Parameters>("JobUpdated", parameters =>
            {
                var id = parameters["id"];
                var userName = parameters.GetParameter("userName", "N/A");
                Console.WriteLine($"Job with ID '{id}' was modified by '{userName}'.");
            });

            try
            {
                connection.StartAsync().GetAwaiter().GetResult();
                var conditions = new[]
                {
                    new { Item = "Priority", QueryOperator = "GreaterThan", Value = "1" }
                };

                connection.InvokeAsync("AddJobFilter", "wf-jobs", conditions).GetAwaiter().GetResult();
            }
            catch (HubException e)
            {
                Console.WriteLine(e.Message);
                Console.ReadLine();
                Environment.Exit(0);
            }

            Console.WriteLine($"Listening on {url}. Press any key to quit...");
            Console.ReadKey();
        }

        private static Task<string> GetAccessToken()
        {
            return Task.FromResult(Environment.GetEnvironmentVariable("JwtSignalRHub"));
        }
    }
}
When building SignalR clients in production, always remember to consider and handle the situation of lost connection.
How to: Set up an authorization server
This 10 minutes video demonstrates how to set up a Domain Services authorization server to support the OAuth 2.0 authorization flow Resource Owner Password Credentials.
How to: Configure the password reset flow
The Domain Services Authorization Server supports a flow for resetting user account passwords. This flow is configured by the below section in the appsettings.json file:
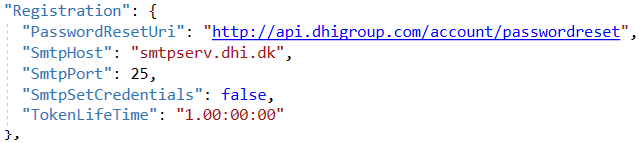
PasswordResetUri is the base of the reset-link that will be sent by mail to the user who is requesting the password reset.
The API endpoint to start the flow is the POST api/accounts/passwordreset endpoint:
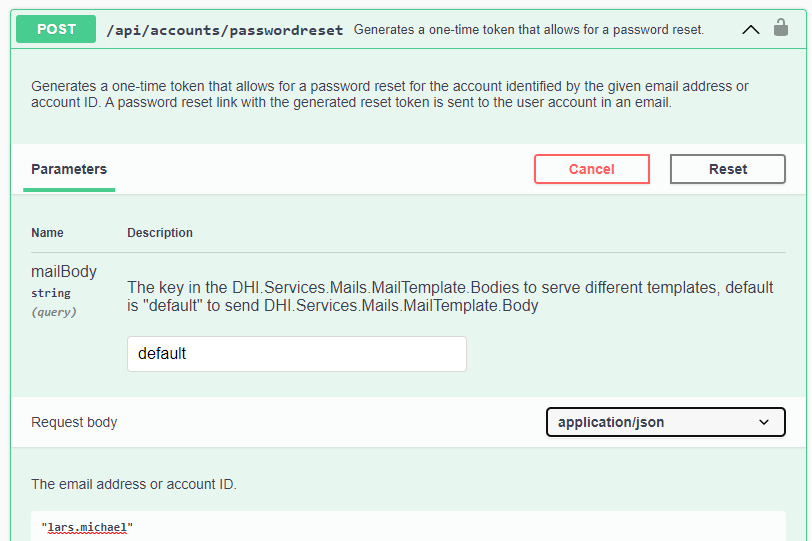
This will trigger an e-mail with a reset-link being send to the e-mail address of the given user account. The default e-mail template will generate a mail like this:
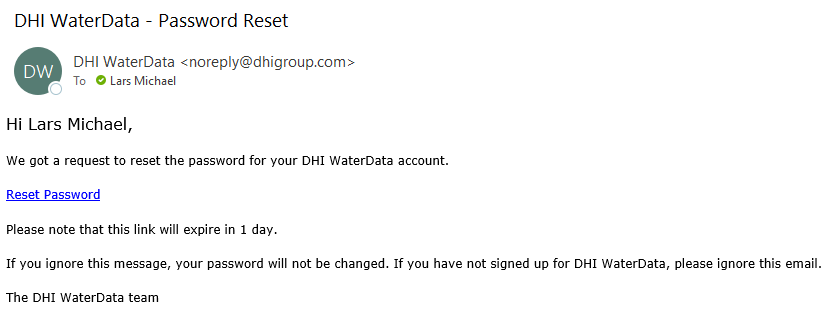
This e-mail template is configurable. You can even configure multiple e-mail template bodies that can be requested using a mailBody query string parameter.
The actual link in the mail will be a URL composed by the PasswordResetUri setting (see above) and an auto generated (time limited) reset-token:
https://api.dhigroup.com/account/passwordreset?token=7e66df308d5541d3814b98a571a5ed11
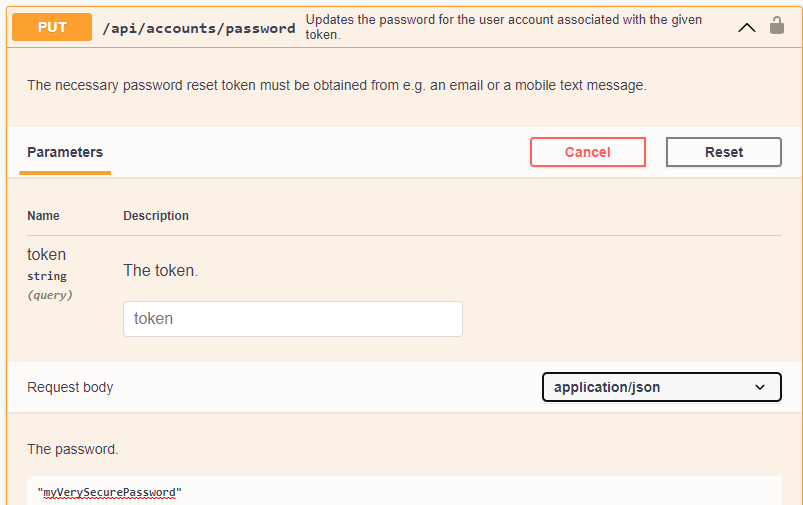
At this URL the user should be presented by a form for entering a new password. Behind the scenes, this form should eventually call the PUT api/accounts/password endpoint:
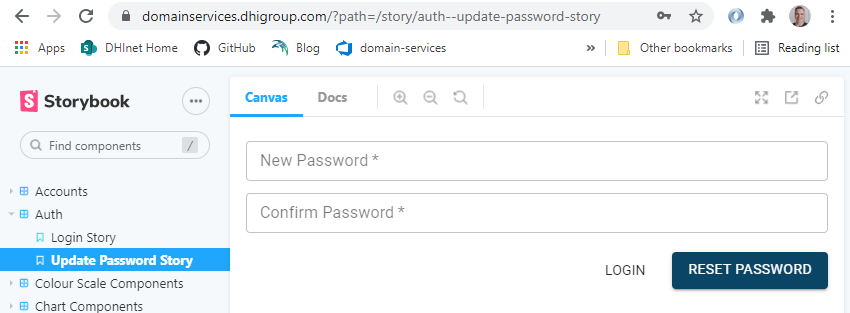
It is up to the application to establish this reset password form, but there is a React component available that supports this behavior out of the box:
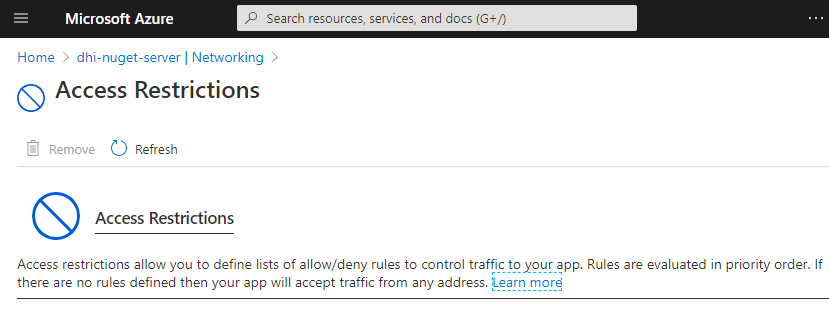
How to: Configure access restrictions for the internal NuGet server
Use Networking -> Access Restrictions
How to: Automate deployment using Chocolatey
If your hosting environment is Windows, the Chocolatey package manager for Windows can be used to automate deployment.
With Chocolatey you can automate the work to check if any processes/jobs are running, stop running services, delete existing files, deploy new files, and start services. Files can be placed in the same folder by default so a team will always be able to find them. Every deployment can be stamped with a version number so one can tell what's installed on the system now and which build/features/bugs the team is dealing with.
Chocolatey is based on NuGet packages and provides a framework for building the packages and performing typical deployment operations like install/update/uninstall.
After a project is built with an auto-incrementing version number (try the GitVersion tool for auto-incrementing version numbers), all resulting files are assembled into a nuget package by Chocolatey. This package can be placed on a file share or stored in an artifact repository (such as Azure DevOps Artifacts). Packages can be installed directly from the artifact repository or downloaded as a file and manually copied to the server before install. This works well in Azure DevOps build pipelines but would also work fine if built on a dev PC or a build server.
Three files are required when authoring a Chocolatey package:
- Xml file with package metadata such as id and name
- 'install' powershell script which install services, opens ports, sets folder permissions etc
- 'beforemodify' powershell script which is called before an upgrade or uninstallation and stops/uninstalls services and deletes files
Each time you want to upgrade a system to the next version, run the following command (typically from a bat file):
choco upgrade -y mypackage
If you want to check what package versions are installed on the system now, run the following command:
choco list -l
How to: Enable error logging in the Web APIs
Error logging in the Web APIs is activated by adding the UseExceptionHandlingWithLogging middleware to the ASP.NET Core pipeline. This is done by calling the IApplicationBuilder extension method in the startup.cs file:
app.UseExceptionHandlingWithLogging();
Furthermore, you have to register an ILogger in the IServiceCollection for dependency injection. In the below example a JsonLogger logging to a JSON file in the App_Data folder is registered, but it could have been any type of ILogger - for example the Logger in the PostgreSQL provider.
services.AddScoped<ILogger>(provider => new JsonLogger("[AppData]log.json".Resolve()));
By default, all exceptions are logged with a severity level of "Warning" and with the exception message only (low verbosity). However, these defaults can be overridden in the appsettings.json file. For example, the below settings will log exceptions with the severity level "Error" and high verbosity (i.e. the complete exception - including the inner stack trace):
{
  ...
  "Logger": {
    "LogLevel": "Error",
    "Verbose": true
  }
}
As an example, a request to the Scenarios API for a scenario that does not exist will result in the following log entry:
"61ad03fa-5de7-4286-ba17-9eb341cf4803": {
    "Id": "61ad03fa-5de7-4286-ba17-9eb341cf4803",
    "DateTime": "2021-02-17T15:41:09.9715972Z",
    "LogLevel": "Warning",
    "Source": "DHI.Services.Jobs",
    "Tag": "Web API exception",
    "MachineName": "LAM-PC1",
    "Text": "Scenario with id 'my-scenario' was not found.",
    "Metadata": {
      "Method": "GET",
      "Path": "/api/scenarios/json-scenarios/my-scenario"
    }
  }
How to: Enable password validation against breached passwords
If you are using the Domain Services user account management in DHI.Services.Security.WebApi, you can enable password validation against the haveibeenpwned.com API by doing the following:
Install the Microsoft.Extensions.Http.Polly NuGet package (version 2.2.0) in your ASP.NET Core project.
In the ConfigureServices method in the startup.cs file, register an IPwnedPasswordsClient for example like this:
services.AddPwnedPasswordHttpClient(minimumFrequencyToConsiderPwned: 1)
    .AddTransientHttpErrorPolicy(p => p.RetryAsync(3))
    .AddPolicyHandler(Policy.TimeoutAsync<HttpResponseMessage>(TimeSpan.FromSeconds(2)));
The minimumFrequencyToConsiderPwned argument defines when to consider a password as pwned. In this example it is set to 1 to never allow a password found in any breach. Also the retry count and the timeout interval can be configured.
How to: Configure a password policy
If you are using the Domain Services user account management in DHI.Services.Security.WebApi, you can configure a password policy to ensure that users are forced to define strong passwords according to this policy.
To configure such a policy in your ASP.NET project, register a PasswordPolicy in the ConfigureServices method in the startup.cs file:
services.AddScoped(_ => new PasswordPolicy
{
    RequiredLength = 10,
    RequiredUniqueChars = 5,
    RequireNonAlphanumeric = false
});
There are 6 different properties that can be set on a PasswordPolicy. The below table shows these properties and their default values:
| Property | Description | Default |
|---|---|---|
| RequiredLength | The minimum length of passwords | 6 |
| RequiredUniqueChars | The minimum number of unique characters. | 1 |
| RequireNonAlphanumeric | A boolean indicating if passwords must contain a non-alphanumeric character. | true |
| RequireLowercase | A boolean indicating if passwords must contain a lower case ASCII character. | true |
| RequireUppercase | A boolean indicating if passwords must contain a upper case ASCII character. | true |
| RequireDigit | A boolean indicating if passwords must contain a digit. | true |
If a given password does not meet the requirements of the password policy, a response with the individual violations will be returned, for example:
{
  "success": false,
  "errors": [
    {
      "code": "PasswordIsTooShort",
      "description": "Passwords must be at least 10 characters."
    },
    {
      "code": "PasswordRequiresNonAlphanumeric",
      "description": "Passwords must have at least one non alphanumeric character."
    },
    {
      "code": "PasswordRequiresUpper",
      "description": "Passwords must have at least one uppercase ('A'-'Z') letter."
    }
  ]
}
How to: Relax authorization in a Web API
The Domain Services Web API components are all "secure by default". This is a deliberate choice to avoid accidental security issues.
All controller actions (endpoints) are decorated with the [Authorize] attribute. This limits access to authenticated users.
Some, more sensitive, endpoints have an even stricter access control. They use policy-based authorization. For example, endpoints for adding, updating and deleting resources are typically protected with an "EditorsOnly" policy:
[Authorize(Policy = "EditorsOnly")]
public IActionResult Delete(string connectionId, string id)
{
    ...
}
The most sensitive endpoints - for example the endpoint for adding new user accounts - are protected by an "AdministratorsOnly" policy
[Authorize(Policy = "AdministratorsOnly")]
public async Task<ActionResult<AccountDTO>> Add([FromBody] AccountDTO accountDTO)
{
    ...
}
So all of the above code is embedded (hard-coded) in the Web API components, but the two authorization policies ("EditorsOnly" and "AdministratorsOnly") are defined in the Program.cs file of your own Web API project(s).
By default - i.e. in the Visual Studio project template - these are configured to be based on group memberships extracted from the claims in the JWT access token:
// Authorization
builder.Services.AddAuthorization(options =>
{
    options.AddPolicy("AdministratorsOnly", policy => policy.RequireClaim(ClaimTypes.GroupSid, "Administrators"));
    options.AddPolicy("EditorsOnly", policy => policy.RequireClaim(ClaimTypes.GroupSid, "Editors"));
});
However, since these policies are configurable, you can modify them to be based on for example ClaimTypes.Role instead of ClaimTypes.GroupSid.
If you have no way to identify calling users as "editors" or "administrators", for example if using Google or Facebook authentication, you can define both policies like below, so that all authenticated users full-fill the requirements of both policies:
// Authorization
builder.Services.AddAuthorization(options =>
{
    options.AddPolicy("AdministratorsOnly", policy => policy.RequireAuthenticatedUser());
    options.AddPolicy("EditorsOnly", policy => policy.RequireAuthenticatedUser());
});
You should be aware that this is a major relaxation of security, since now all authenticated users have access to all endpoints.
You can relax the security even further, and completely bypass the authorization mechanism, by registering the authorization handler AllowAnonymousHandler. This is a dramatic relaxation since then, no authentication or authorization will take place at all. Hence, You should only use this in production environments after careful considerations:
if (builder.Environment.IsDevelopment())
{
    builder.Services.AddSingleton<IAuthorizationHandler, AllowAnonymousHandler>();
}
NOTE: The authorization handler
AllowAnonymousHandleris available from version 5.2.0 of the DHI.Services.WebApiCore NuGet package.
How to: Add custom functionality to a Web API
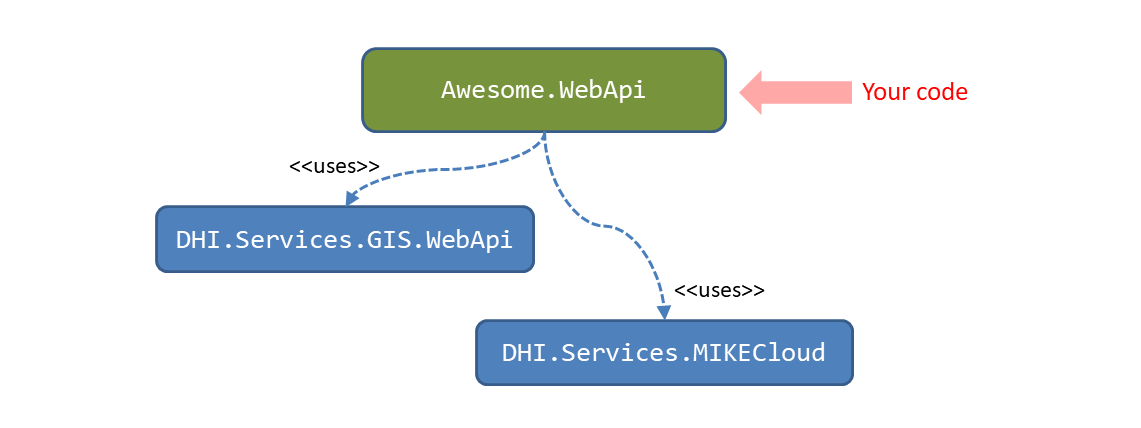
Since a Domain Services Web API is essentially a standard ASP.NET project with some Domain Services NuGet packages installed, it is quite easy to extend such a Web API with custom project-specific functionality. For example, your awesome application might include a Web API, called Awesome.WebApi, exposing endpoints for retrieving GIS-data from the MIKE Cloud Platform. In that case, you would have installed the DHI.Services.GIS.WebApi NuGet package with the standard GIS-endpoints and the DHI.Services.MIKECloud package with the MIKE Cloud Platform provider:
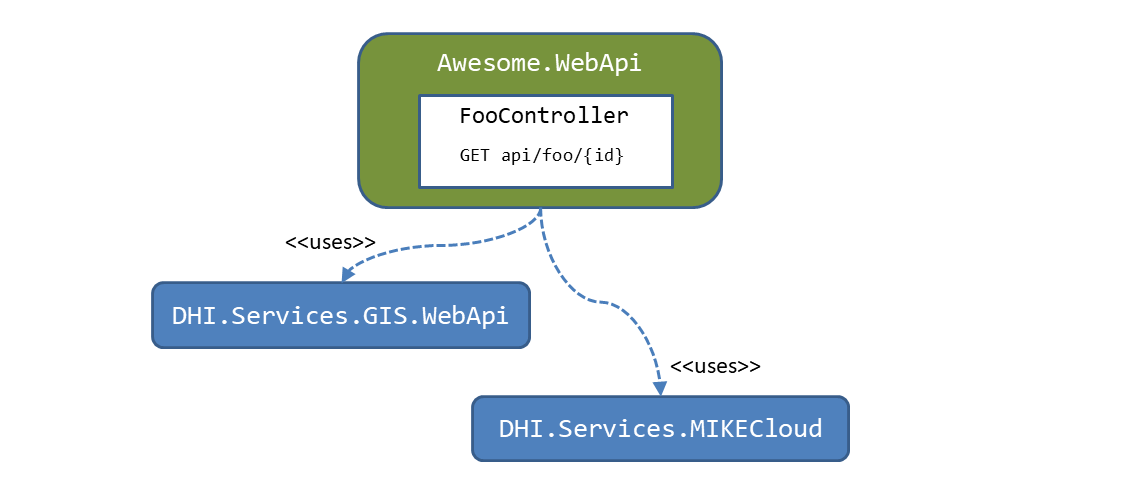
Now, if you want to add some endpoints for a custom Foo resource - for example GET api/foo/{id} - you simply add a new FooController class to your Web API project and implement your custom functionality here:
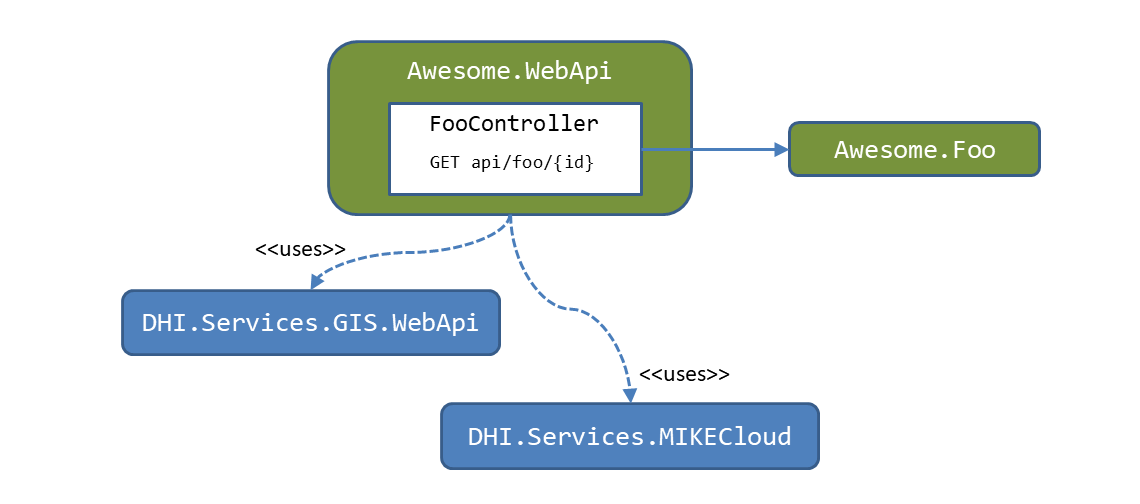
If you want to refine this a bit, you should probably isolate the Foo business logic in it's own component Awesome.Foo:
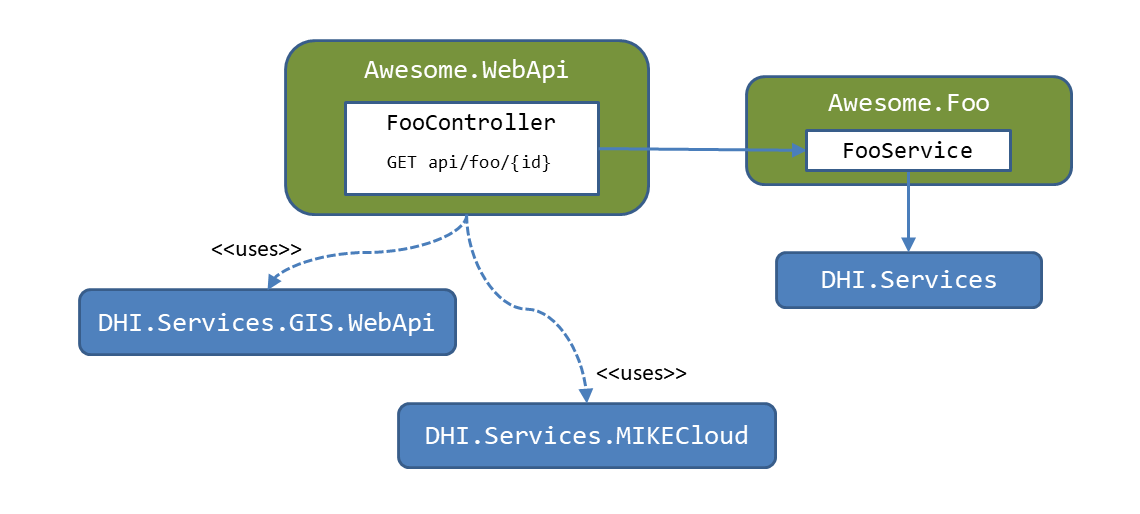
If you want to further refine this solution, you can mimic the "Domain Services way" of doing things by using the Domain Services core (the DHI.Services NuGet package) as a framework for creating your own FooService. For details on this approach, see Using Domain Services as a Framework.
Finally, you can completely isolate your custom functionality in it's own microservice by making a dedicated ASP.NET Web API project Awesome.Foo.WebApi with your custom FooController:

How to: Migrate to ASP.NET 5.0
The latest version of the Web API components target .NET 5.0. To migrate an existing web project to ASP.NET 5.0, you must modify the following files:
The project file (.csproj):
Update the target framework to net5.0:
<PropertyGroup>
  <TargetFramework>net5.0</TargetFramework>
</PropertyGroup>
Remove obsolete package references, for example:
<ItemGroup>
  ...
  <PackageReference Include="Microsoft.AspNetCore" Version="2.2.0" />
  <PackageReference Include="Microsoft.AspNetCore.HttpsPolicy" Version="2.2.0" />
  <PackageReference Include="Microsoft.AspNetCore.ResponseCompression" Version="2.2.0" />
  ...
</ItemGroup>
Instead, add the following package references:
<ItemGroup>
  ...
  <PackageReference Include="Microsoft.AspNetCore.Authentication.JwtBearer" Version="5.0.10" />
  <PackageReference Include="Microsoft.AspNetCore.Mvc.NewtonsoftJson" Version="5.0.10" />
  ...
</ItemGroup>
If you were previously using the API analyzers Microsoft.AspNetCore.Mvc.Api.Analyzers, this package is on the list of obsolete references and must be removed. Instead, edit your project file to reference the analyzers shipped as part of the .NET Core Web SDK:
<PropertyGroup>
    ...
    <IncludeOpenAPIAnalyzers>true</IncludeOpenAPIAnalyzers>
    ...
</PropertyGroup>
Program.cs
The IWebHostBuilder is obsolete and must be replaced with the generic IHostBuilder. The Program class must look like this:
using Microsoft.AspNetCore.Hosting;
using Microsoft.Extensions.Hosting;

public class Program
{
    public static void Main(string[] args)
    {
        CreateHostBuilder(args).Build().Run();
    }

    public static IHostBuilder CreateHostBuilder(string[] args) =>
        Host.CreateDefaultBuilder(args)
            .ConfigureWebHostDefaults(webBuilder =>
            {
                webBuilder.UseStartup<Startup>();
            });
}
Startup.cs
In the ConfigureServices method, replace AddMvc with AddControllers and add support for Newtonsoft.Json:
services
    ...
    .AddControllers()
    .AddNewtonsoftJson(options =>
    {
        options.SerializerSettings.NullValueHandling = NullValueHandling.Ignore;
        options.SerializerSettings.TypeNameAssemblyFormatHandling = TypeNameAssemblyFormatHandling.Simple;
        options.SerializerSettings.Converters.Add(new IsoDateTimeConverter());
        options.SerializerSettings.Converters.Add(new StringEnumConverter());
        options.SerializerSettings.Converters.Add(new KeyValuePairConverter());

    });
The Swagger configuration should be replaced with something like this:
services.AddSwaggerGen(setupAction =>
{
    setupAction.SwaggerDoc(Configuration["Swagger:SpecificationName"], new OpenApiInfo
    {
        Title = Configuration["Swagger:DocumentTitle"],
        Version = "1",
        Description = File.ReadAllText(Configuration["Swagger:DocumentDescription"].Resolve())
    });

    setupAction.EnableAnnotations();
    setupAction.IncludeXmlComments(Path.Combine(AppContext.BaseDirectory, "DHI.Services.Connections.WebApi.xml"));
    setupAction.AddSecurityDefinition("Bearer", new OpenApiSecurityScheme
    {
        Description = "Enter the word 'Bearer' followed by a space and the JWT.",
        Name = "Authorization",
        In = ParameterLocation.Header,
        Type = SecuritySchemeType.ApiKey,
        Scheme = "Bearer"
    });

    setupAction.AddSecurityRequirement(new OpenApiSecurityRequirement()
    {
        {
            new OpenApiSecurityScheme
            {
                Reference = new OpenApiReference
                {
                    Type = ReferenceType.SecurityScheme,
                    Id = "Bearer"
                },
                Scheme = "oauth2",
                Name = "Bearer",
                In = ParameterLocation.Header,
            },
            new List<string>()
        }
    });
});
services.AddSwaggerGenNewtonsoftSupport();
NOTE: Newtonsoft.Json support must be added to Swagger generation
In the Configure method replace IHostingEnvironment with IWebHostEnvironment and add a using statement for the Microsoft.Extensions.Hosting namespace.
public virtual void Configure(IApplicationBuilder app, IWebHostEnvironment env)
{
    ...
}
In the Configure method, replace UseMvc with UseRouting and UseEndpoints:
public virtual void Configure(IApplicationBuilder app, IWebHostEnvironment env)
{
    ...
    app.UseRouting();
    app.UseAuthorization();
    app.UseEndpoints(endpoints =>
    {
        endpoints.MapControllers();
    });
    ...
}
For details, see Migrate Startup.Configure.
How to: Install SQL Server Developer Edition
The following procedure providing the steps to install SQL Server 2017 Edition, however, similar steps can be followed for all the versions of SQL Server developer edition.
To install SQL Server, you need to download it from the Microsoft.com website via the following link:
Once the download completes, you double-click the file SQLServer2017-SSEI-Dev.exe to launch the installer.
-
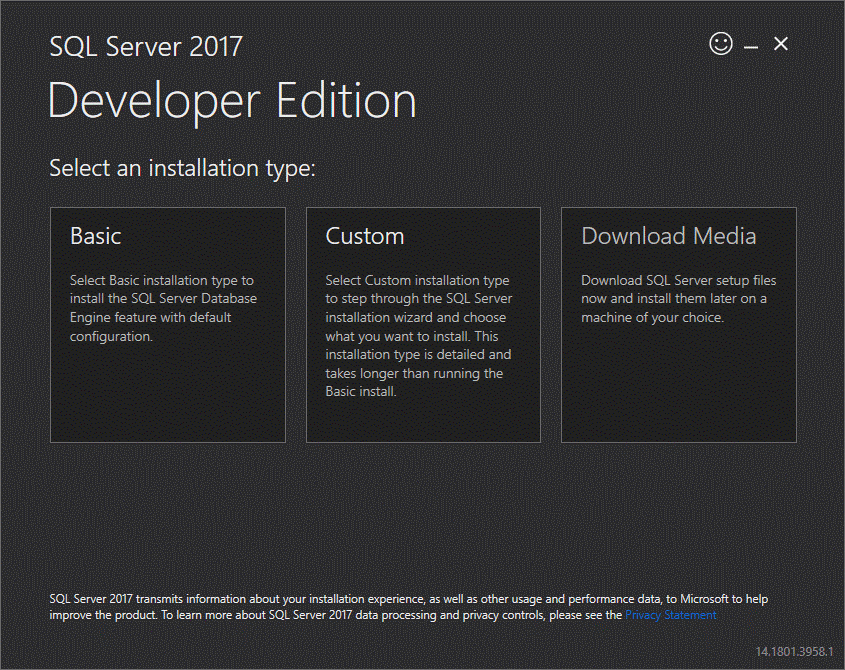
The installer asks you to select the installation type, choose the Custom installation type allows you to step through the SQL Server installation wizard and select the features that you want to install.
-
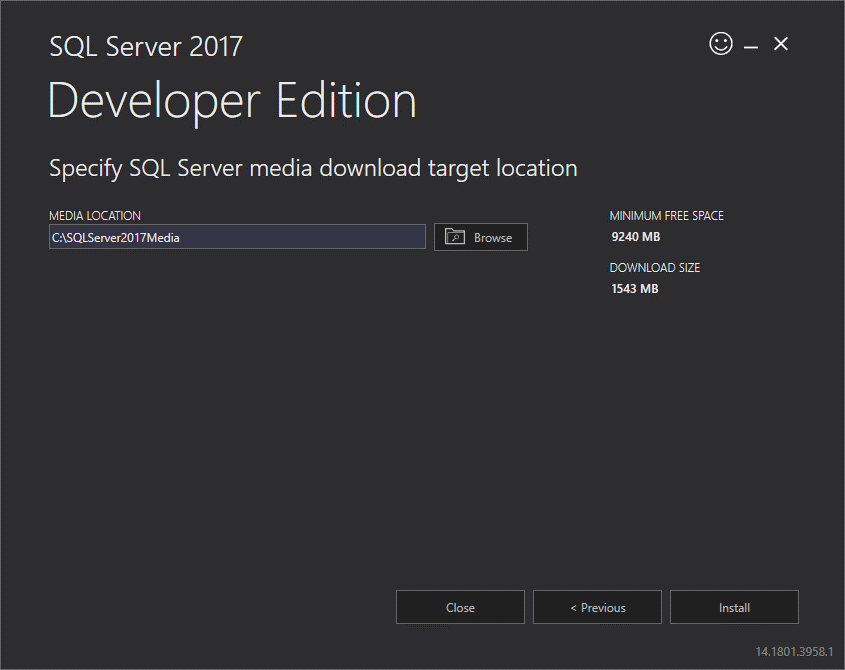
Specify the folder for storing the installation files that the installer will download, then click the Install button.
-
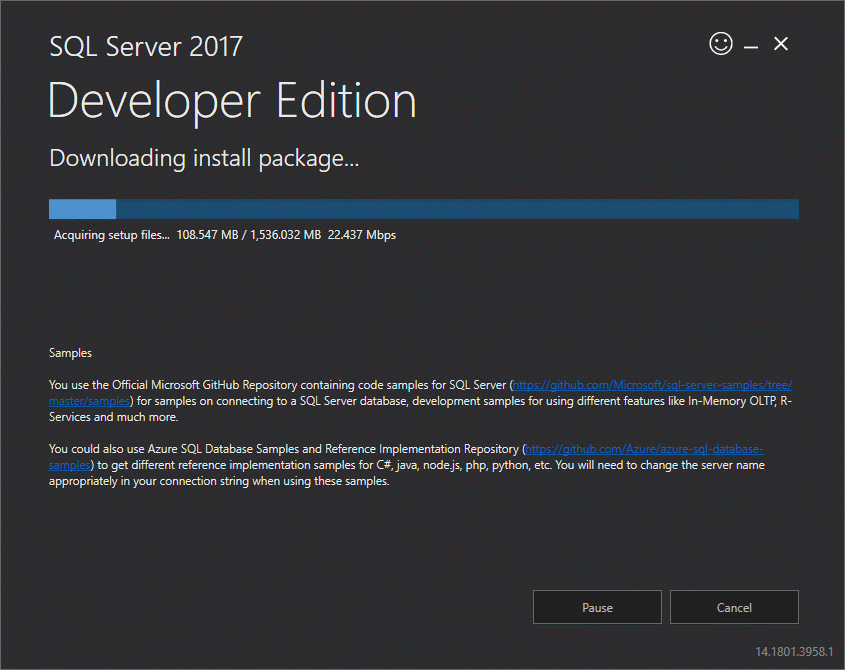
The installer starts downloading the install package for a while.
-
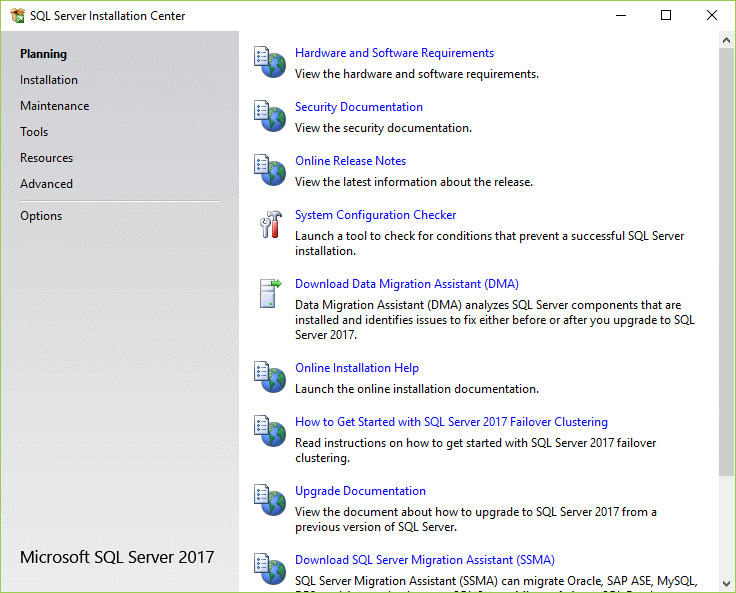
Once the download completes, open the folder that stores the install package and double-click the SETUP.exe file.

-
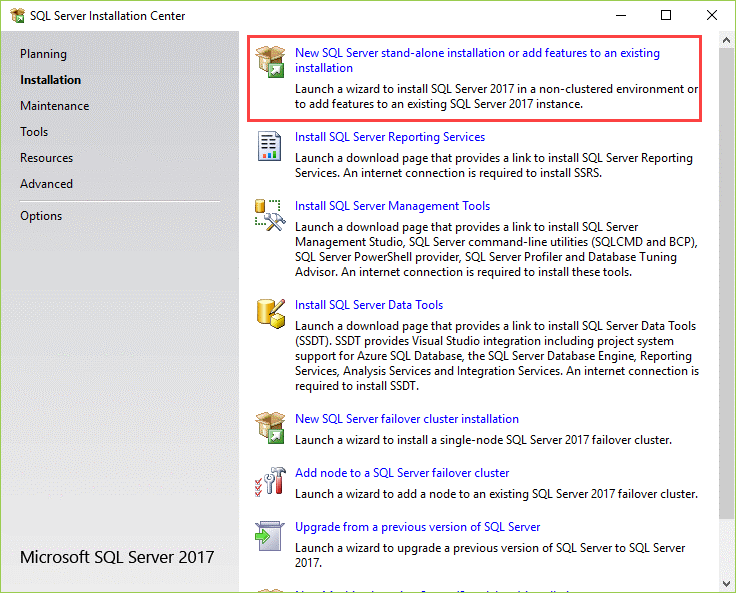
The following window displays; select the installation option on the left.
-
Click the first link to launch a wizard to install SQL Server 2017.
-
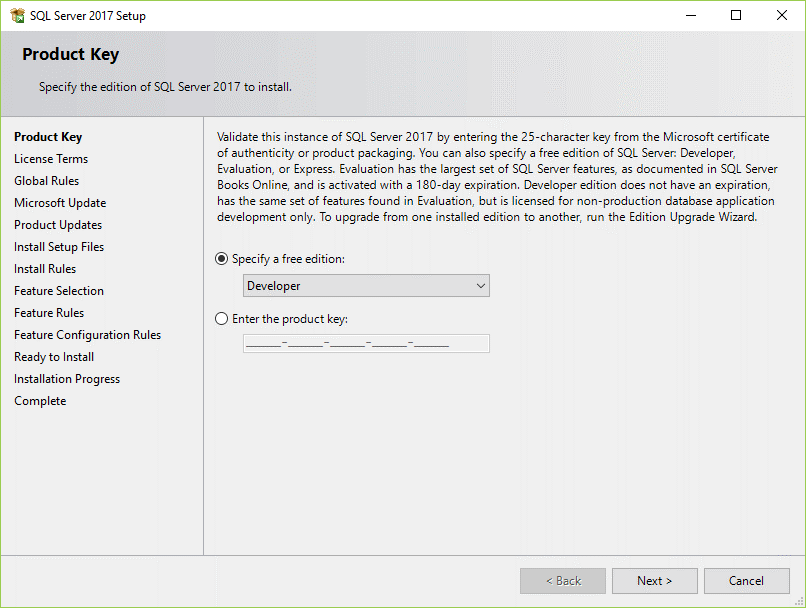
Specify the edition that you want to install, select Developer edition and click the Next button.
-
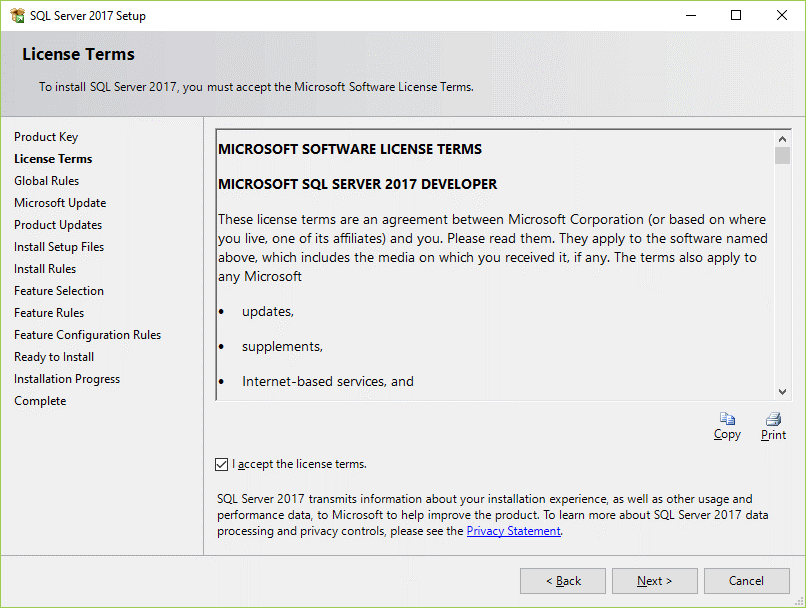
Select the “I accept the license terms.” and click the Next button.
-
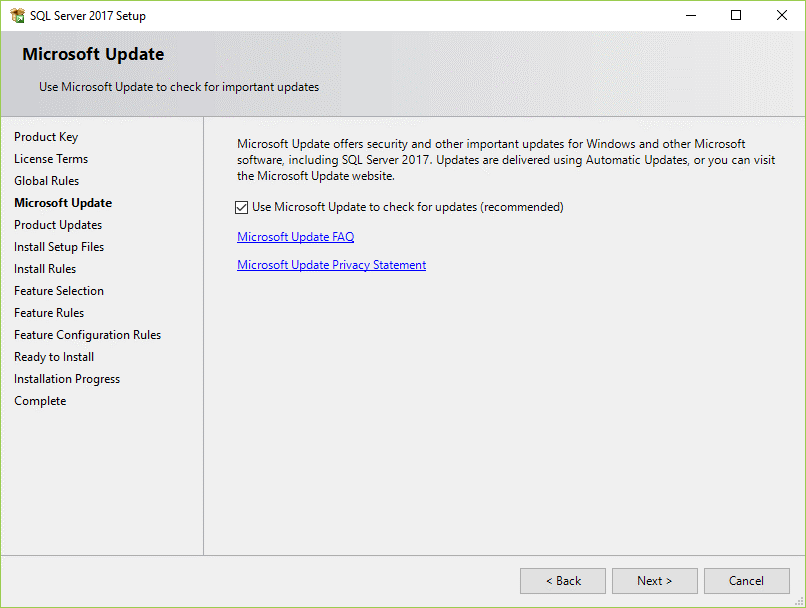
Check the “Use Microsoft Update to check for updates (recommended)” to get the security and other important updates for the SQL Server and click the Next button.
-
The installation checks for the prerequisites before installation. If no error found, click the Next button.
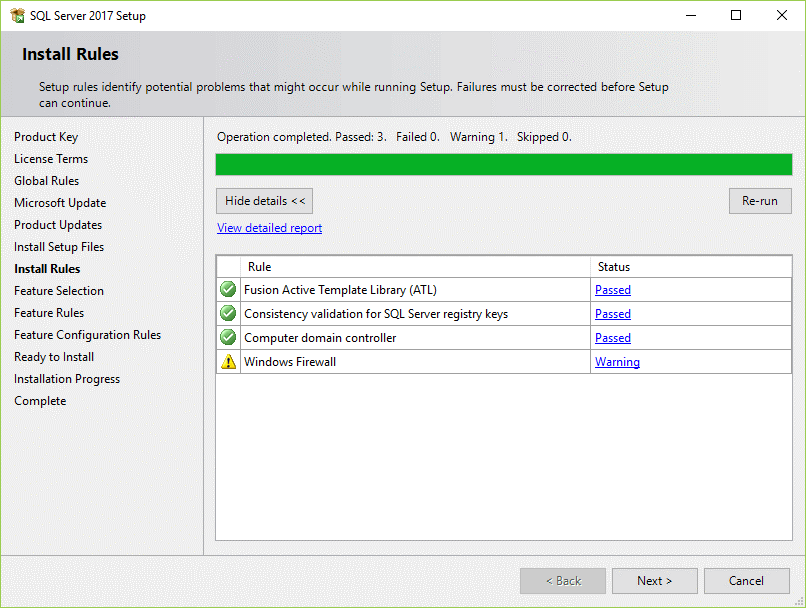
-
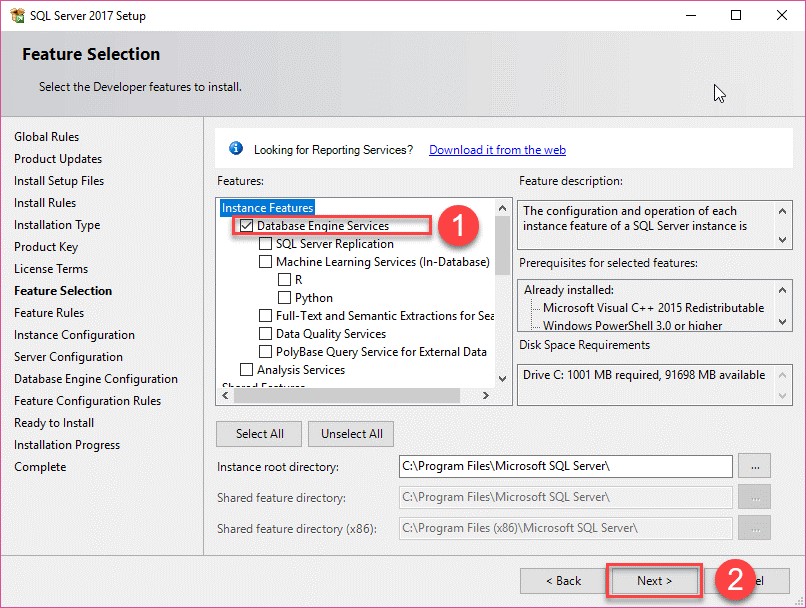
Select the features that you want to install. For now, you just need the Database Engine Services, just check the checkbox and click the Next button to continue.
-
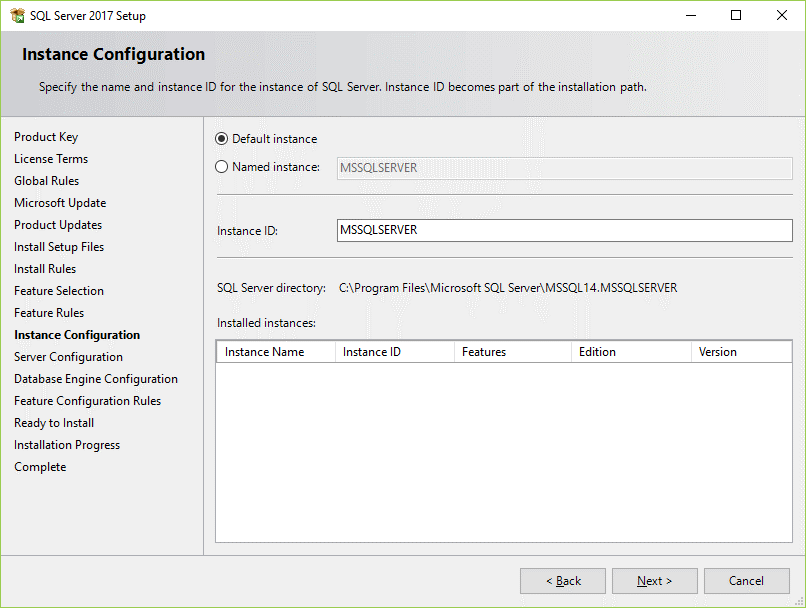
Specify the name and install ID for the instance of the SQL Server and click the Next button.
-
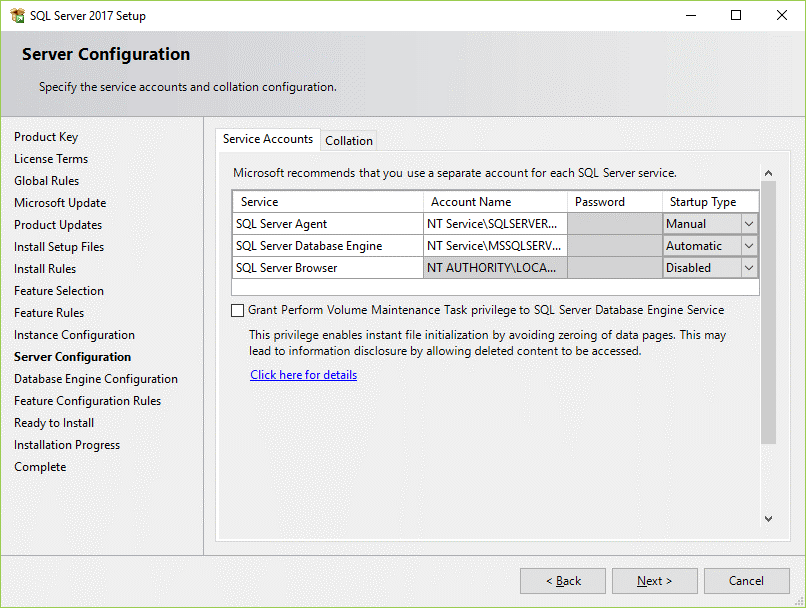
Specify the service account and collation configuration. Just use the default configuration and click the Next button.
-
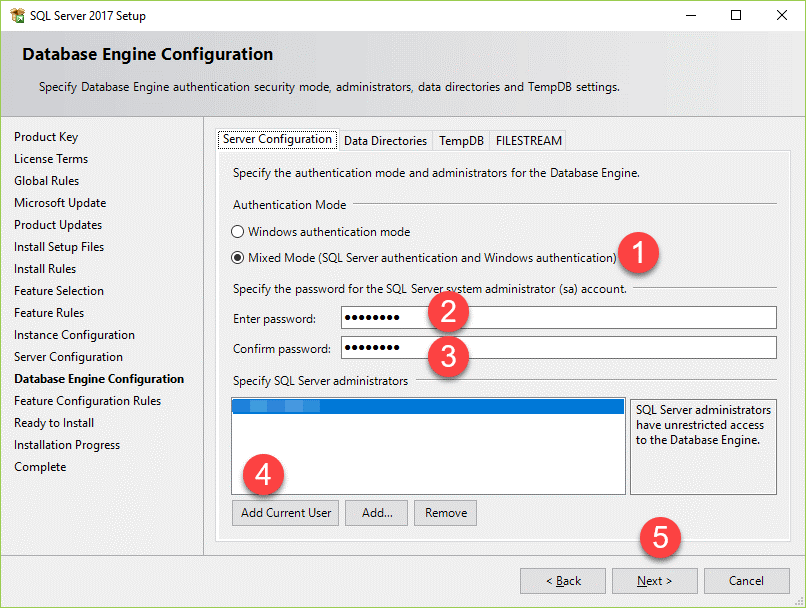
Specify the database engine security mode. First, choose Mixed Mode. Next, enter the password for the SQL Server system administrator (sa) account. Then, re-enter the same password to confirm it. After that, click the Add Current User button. Finally, click the Next button.
-
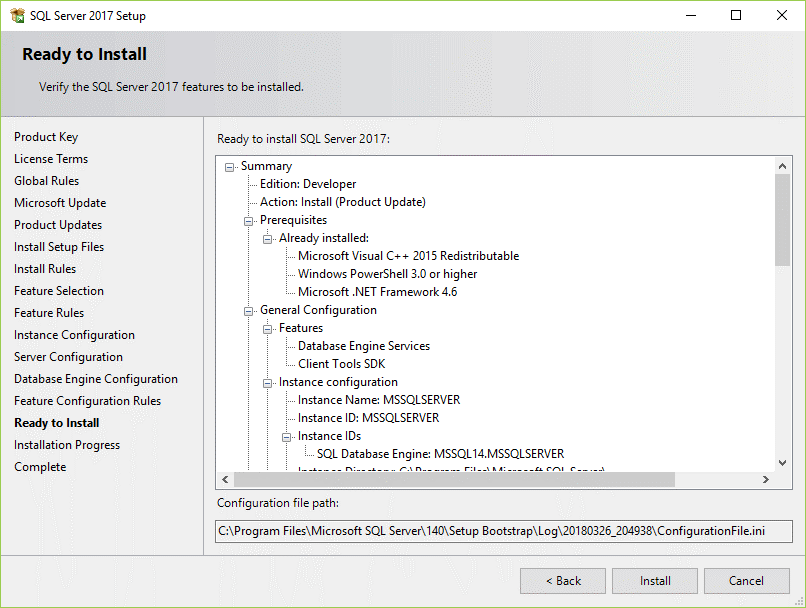
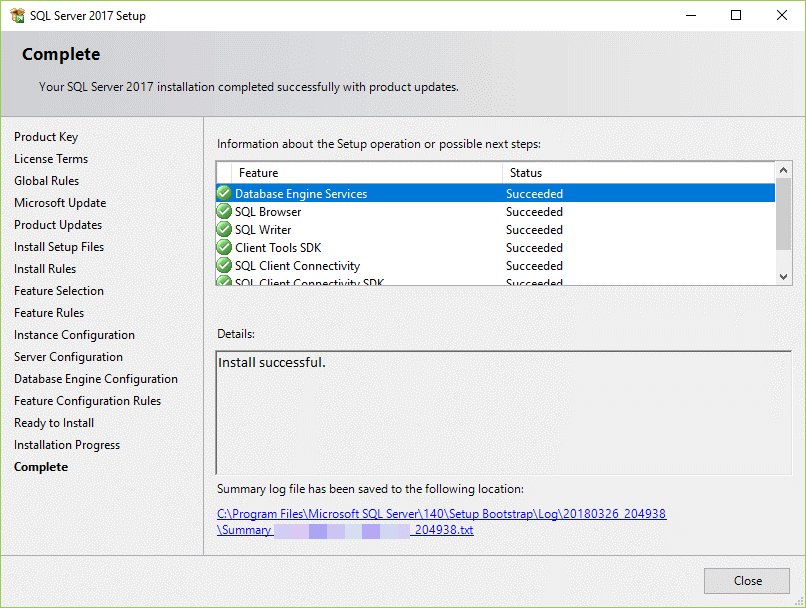
Verify the SQL Server 2017 features to be installed:
-
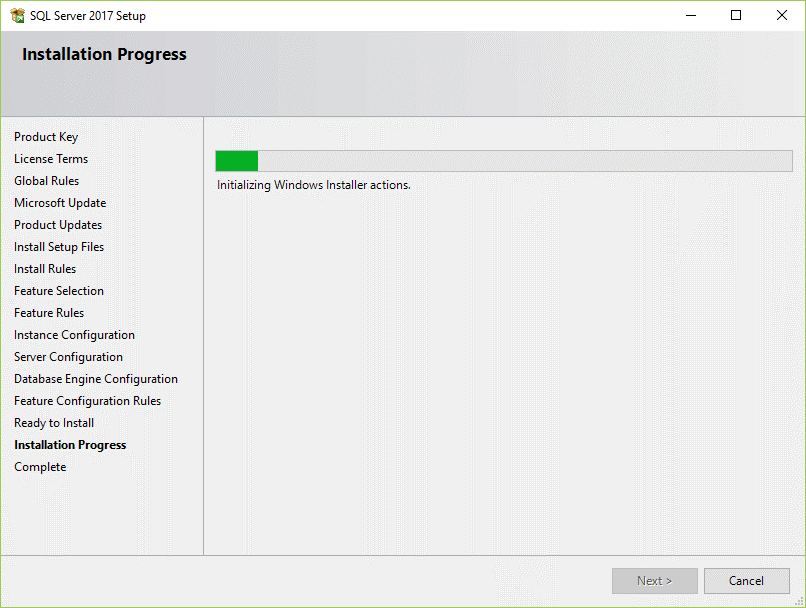
The installer starts the installation process.
-
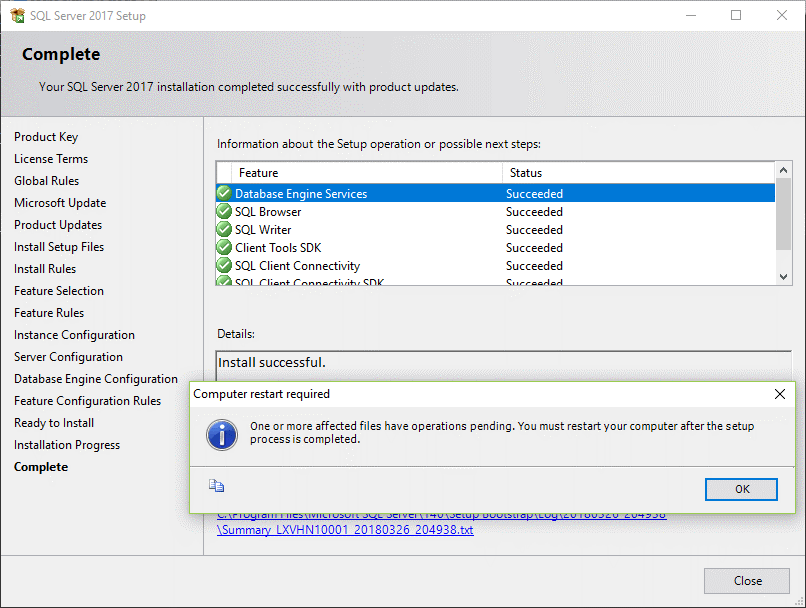
Once it completes, the following window displays. Click the OK button.
-
Click the Close button to complete the installation.
-
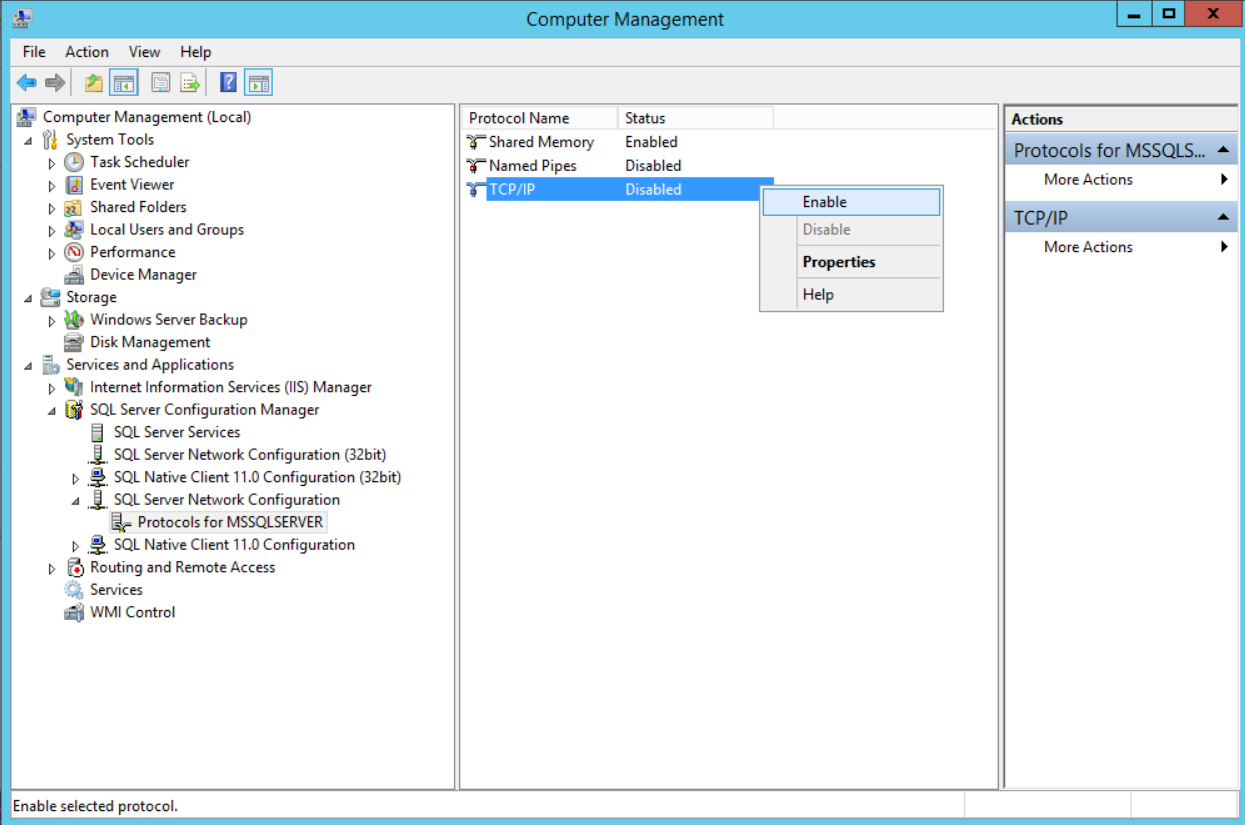
Once the installation is complete the network protocol for SQL server need to be enabled, to do that go to Computer Management > Services and Applications > SQL server Configuration Manager > SQL Server Network Configuration > Protocols for MSSQLSERVER. Once there enable TCP/IP settings.
Install Microsoft SQL Server Management Studio
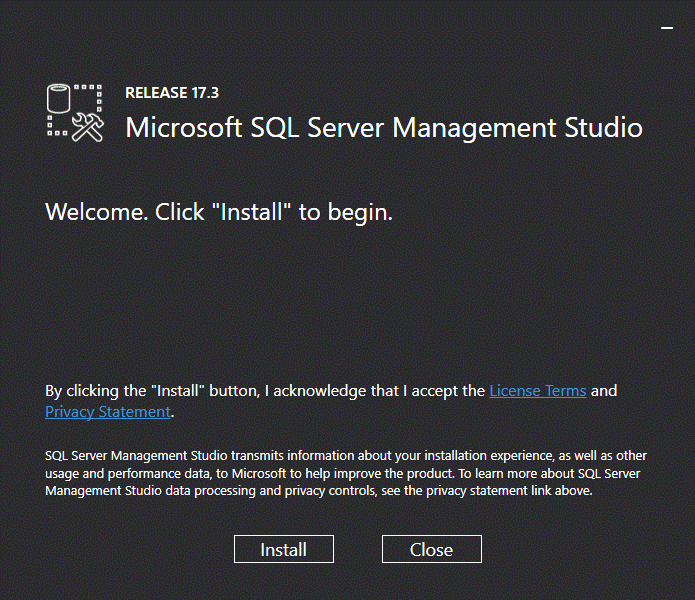
To interact with SQL Servers, you need to install SQL Server Management Studio (SSMS). The SQL Server Management Studio is a software for querying, designing, and managing SQL Server on your local computer or in the cloud. It provides you with tools to configure, monitor, and administer SQL Server instances.
First, download the SSMS from the Microsoft website via the following link:
Download SQL Server Management Studio
Second, double-click the installation file SSMS-Setup-ENU.exe to starting installing. The installation process of SMSS is straightforward which you just need to follow the screen sequence.
-
Click the Install button
-
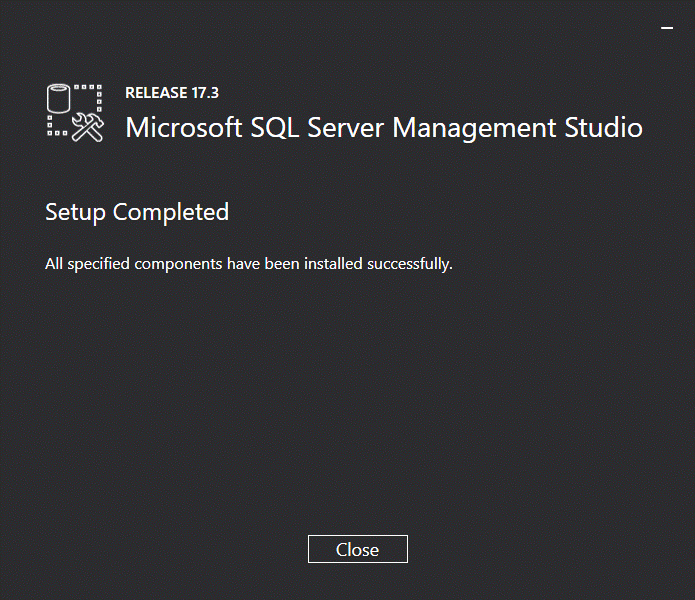
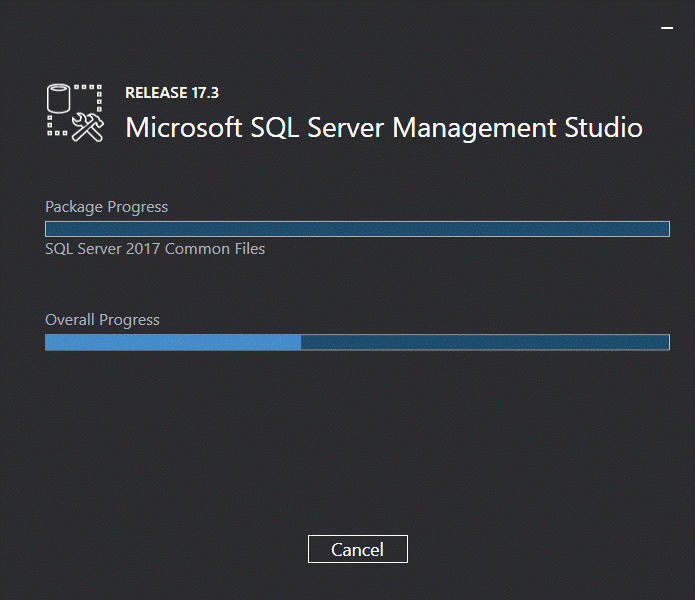
Wait for few minutes while the installer sets up the software.
-
Once setup is completed, click the Close button.